Forensic ID is a suite of Photoshop plug-ins for performing forensic image analysis and enhancement.
| Notable features include:
|
|


|
- 8- and 16-bit image support in grayscale, RGB, and Lab
- Easy access to other color spaces (Lab, HSV, YCBCR, YCOCG, CMY, etc)
- Deconvolution with nine (9) blur models, including a bokeh blur for underfocused images
- New perceptual tone constancy color space contrast enhancement
- Principal Components Analysis
- Quad-view edge and detail examination for image triage and sharpening
- Halo-free detail recovery
- Processing descriptions placed right in the History Log or recorded Action
- Motion blur picks up length and angle from Photoshop Ruler tool
- 5 methods of Stack/Layer averaging, using layers marked visible and shifted/resized/rotated by user
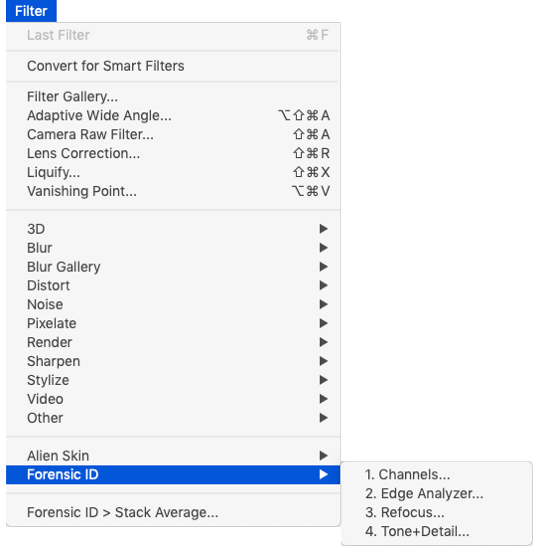
The tools in Forensic ID are organized in workflow-order under the
Filter menu in Photoshop:
|
|
Forensic ID Workflow
|
| Evaluation......................................... |
There are two principal stages to be considered in analyzing images. The first is to decide whether there is anything in them that warrants further investigation. Some images may simply not contain any useful, or new details that justify the more time-consuming procedures needed for enhancement and extraction. Several of the tools are specifically designed to assist in that determination. The sooner you can tell that there is or ISN’T useful detail present, the better. If there is potentially useful information present, the second stage can be undertaken to access it.
- 1. Channels...
This function applies only to color images, and is not available (or meaningful) for gray scale images. The RGB color space used to store and display images is not the only way, nor necessarily the best way, to access the various, sometimes visually subtle, details that may be present. Alternative color spaces rearrange the information in useful ways. The Channels tool converts the original RGB information into several other color spaces and displays four views of selectable color channels. Look for a color space that shows good contrast. 22 different channels are provided, each shown as a grayscale image with maximized contrast. Check the Inverted box to reverse the brightness scale for the selected (highlighted) preview image. Click OK to save the selected result. Since the original image was RGB the resulting image has the same gray scale information in all three channels.
Channel weights can also be customized and/or saved as presets.
- 2. Edge Analyzer...
After selecting the channel that shows the best detail, or using the original color or gray scale image, the next recommended step is to apply the Edge Analyzer to better see what detail is present. Edge Analyzer compares four comprehensive models for the types of edge data and fine details that may be present. If the tattoo or letters on the license plate were big enough, this step wouldn’t matter, however if they’re right at the limits of resolution, being able to tell if they’re actually present is a critical step.
Edge Analyzer has two modes: Edges Only (the default for investigating whether there is useful detail in an image) and Sharpen Image which enhances that image detail. For enhancement, the choices that are typically the most useful are BandPass (for a less-noisy sharpen) and Non-Linear (for getting really fine detail). In most cases, enhancements made with Edge Analyzer should be added after Tone+Detail adjustments have been made. (See Enhancement, below)
- 3. Refocus...
Refocus is technically a Wiener Deconvolution. Forensic ID provides nine (9) blur or “point-spread” functions (ways that a point of light are smeared over an area), and several can be tested with varying results. Selecting the blur function depends on the nature and cause of the blurring. These methods can work for images that are lightly compressed or averaged images where the noise is low. Increase the size of the PSF to gain the maximum sharpness without excessive “ringing” of outlines around edges. Deconvolution always increases the visibility of noise in the image, and for each blur function the K-value should be adjusted to the smallest value that suppresses the noise to an acceptable level. In cases where the image brightness has been clipped at 255 (for example, lights in the scene), some pixel data would have been larger than 255 and is unrecoverable.
With these tools an image can be quickly evaluated for meaningful content.
|
| Enhancement.................................... |
After determining that there is something meaningful present in the image, it's time to enhance that detail to either measure or present it. Forensic ID has two functions for that purpose:
- 4. Tone+Detail...
Tone+Detail is a combination Levels function and a detail enhancement function using a perceptual tone constancy color space. The adjustment of overall image brightness and contrast is done (as it is in the basic Photoshop Levels routine) by positioning the sliders shown below the image brightness histogram to mark the black and white limits, and the mid-grey point that adjusts the image gamma. Start with adjusting these limits (while preserving Color Strength). When setting limits, if the option (Mac) or alt (PC) key is depressed the image shows the pixels that are clipped to 0 or 255 in any color channel. Then enhance the bright and dark detail within the image, finally boosting any color strength if needed.
The dark and light detail recovery controls use an Edge Aware Retinex technique — a method of independently finding details without causing halos — but in a manner that is consistent with how people see.
The gamma control initially looks the same as the one within the Levels function, but typically Levels will cause bright areas to undersaturate and dark areas to oversaturate. That side-effect does not happen with Tone+Detail and the perceptual color model.
- 2. Edge Analyzer...
As mentioned above, Edge Analyzer compares four comprehensive modes for edge data and fine details. When used with the Sharpen Image setting, it becomes an image sharpener showing four simultaneous views. Pick the desired one and the amount of sharpness required.
An alternate way of using Edge Analyer is by duplicating the image layer and using the Edges Only setting. Afterward selecting the type of edges and hitting OK, change the layer mode to Hard Light and adjust the opacity as needed. This allows the sharpening layer to be turned on/off, adjusted as needed, or even multiple sharpening layers to be used.
|
|
|

